Contents:
6. One Stop Order Processing overview
9. Managing Customers and Emails
1. Introduction
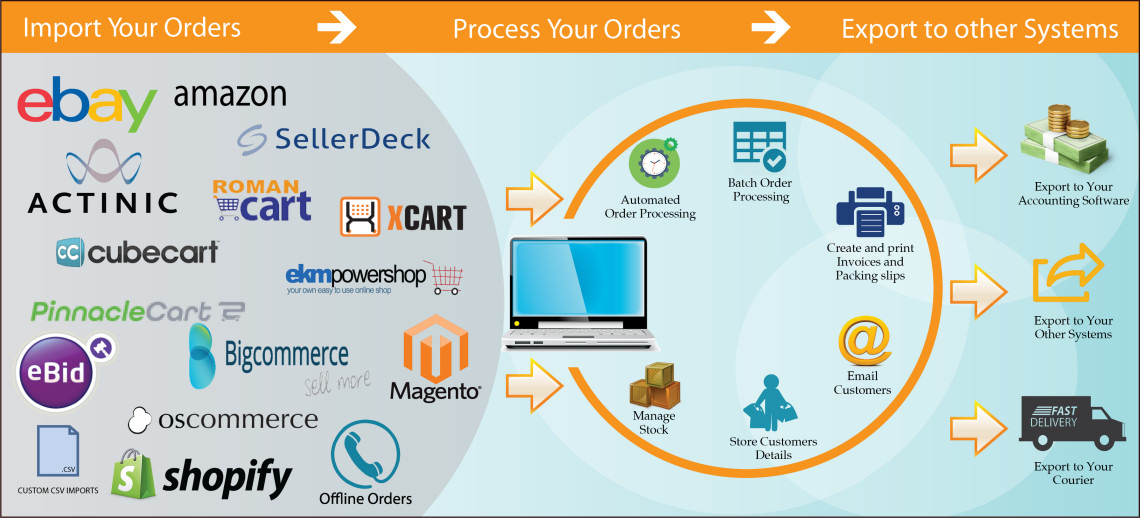
One Stop Order Processing allows you to complete your daily order processing tasks at a much more efficient rate. Management of orders is made a lot easier allowing you to view all of your orders from various selling platforms in one area saving you having to use different processes for each channel. You can select multiple orders at one time, apply any filters to view orders of a certain criteria and quickly take them through to completion at ease.
You can also integrate with other 3rd party applications such as couriers and accounting systems using the order export feature. Orders can be tracked online by your customers by using the built-in order tracking feature (hosted on your website).
2. System Requirements
Runs on Windows 8, 7, Vista, XP, 2003, 2000 or NT
Our software is written for PCs, however you can install it and use it on a Mac using emulation software such as VMWare or Parallels. You can find more information about PC emulation software for macs at the following links:
http://www.parallels.com/uk/products/desktop/
http://www.vmware.com/products/fusion/3. Products and pricing
There are currently four products available for One Stop Order Processing.
We offer four different packages to suit the needs and requirements of our customers, some of the products we offer do not contain all of the features allowing us to provide the software at the best possible price. One Stop Order Processing can be downloaded from our site on the downloads page.
3.1 Products
>Lite has been designed to speed up invoice and packing list printing and to manage the daily order despatch.
Allows you to quickly import and print invoices from all your sales channels
Can be used on up to 3 PCs at the same time.
Supports up to 5,000 orders per site
>Standard has been designed to provide a full order despatch system from stock control to transferring order information to external systems.
Allows you to quickly import, print invoices, manage stock and export order details to third party software, including couriers and accounting systems.
Can be used on up to 5 PCs at the same time
Supports up to 500,000 orders per site
>Standard Plus provides full order processing with advanced order filtering, automated order download and order processing tasks.
Allows you to automatically import, print invoices, manage stock and export order details to third party software, including couriers and accounting systems.
Can be used on up to 5 PCs at the same time
Supports up to 500,000 orders per site
Order Processing tasks can be automated
Complex order filters can be created and saved
NOTE: Automatic order import only supported for Amazon, Ebay and Actinic Desktop/SellerDeck orders (other websites supported soon)
>Premium has been designed for companies that want more than 5 users. Includes telephone support, priority email support and priority feature requests approval
Allows you to automatically import, print invoices, manage stock and export order details to third party software; including couriers and accounting systems.
Order Processing tasks can be automated
Includes use of 5 PC users
Complex order filters can be created and saved
Can be used on up to 15 PCs at the same time
Supports up to 1,000,000 orders per site
Telephone support included
Priority Email support
Priority feature requests approval
NOTE: Automatic order import only supported for Amazon, Ebay and Actinic Desktop/SellerDeck orders (other websites supported soon)
3.2 Free trial
The free trial we offer allows you to test out any of the four licence's we have available.
The trial licence you receive will be of the full product with no limited functionality. We hope this will assist with helping you find out which package is best for you.
The trial licence lasts for 21 days and will expire once it has reached that date. If you have any questions regarding the software whilst on the trial, please contact us through our support site and we will get back to you as soon as possible.
We also have an extensive knowledgebase available on our support site providing you with guides and tips for the software. Click here to access the knowledgebase.
3.3 Pricing
3 Months License 12 Months License 1 PC £19.95 £49.95 2 PCs £27.45 £64.90 3 PCs £34.90 £79.85 Extra PC Not available £19.85
Pricing Information (ex VAT):
3 Months License 12 Months License 1 PC £79.95 £159.95 2 PCs £104.95 £209.90 3 PCs £129.90 £259.85 4 PCs £154.90 £309.80 5 PCs £179.85 £359.75 Extra PC Not available £59.95
3 Months License 12 Months License 1 PC £129.95 £259.95 2 PCs £159.90 £319.95 3 PCs £189.95 £379.95 4 PCs £219.95 £439.95 5 PCs £249.95 £499.95 Extra PC Not available £69.95
Pricing Information (ex VAT):
3 Months License 12 Months License 5 PCs £399.95 £799.95 6 PCs £435.95 £869.95 7 PCs £469.95 £939.95 8 PCs £499.90 £999.95 9 PCs £533.95 £1059.95 10 PCs £559.95 £1119.95 Extra PC Not available £79.90
4. Quick Setup Wizard
When you first open One Stop Order Processing, you will be prompted to start the Quick Setup Wizard which will help with setting up your details in the software.
You can run the Quick Setup Wizard at any time by selecting the Quick Setup Wizard option (under the File menu).
You are shown a series of pages providing the current information for the site. You can enter more detailed information at any stage by using the One Stop Order Processing Options. To show the options select the Options menu choice (under the Tools menu) or by clicking on the Options button ()
Here is the starting page for the Quick Setup Wizard, continue each step by clicking Next.
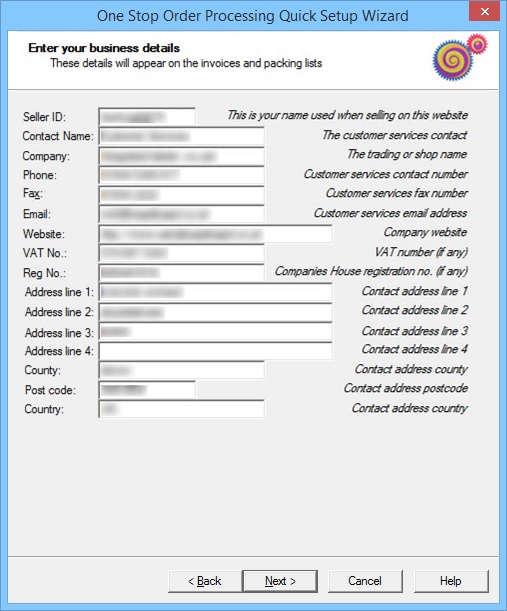
Here is where you will enter your business details, this information is used on the printed invoice and packing lists. The default invoices and packing lists contain macros for the information that is provided in these fields. See the Company Details in the Options for more information.
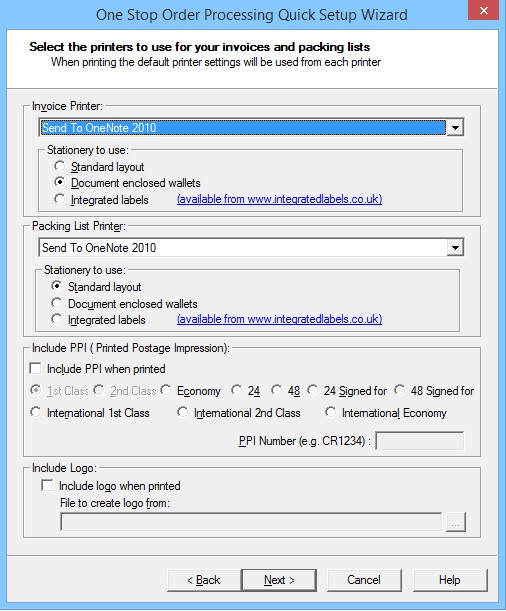
This stage of the Quick Setup Wizard is where you select the printers that you want the invoices and packing lists to print from. There is also the option to set up your PPI and include a logo which will be used on the invoices.
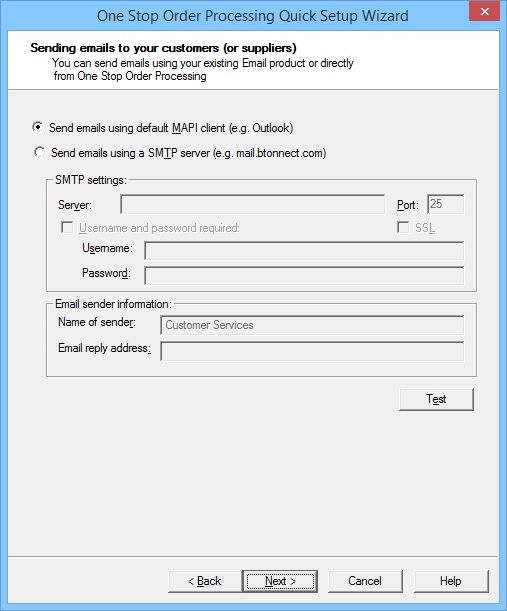
At this stage of the Quick Setup Wizard, you can set up your email settings with the software if you are going to use the emailing feature. Once the information has been entered you have the option to test send an email to check that it is working.
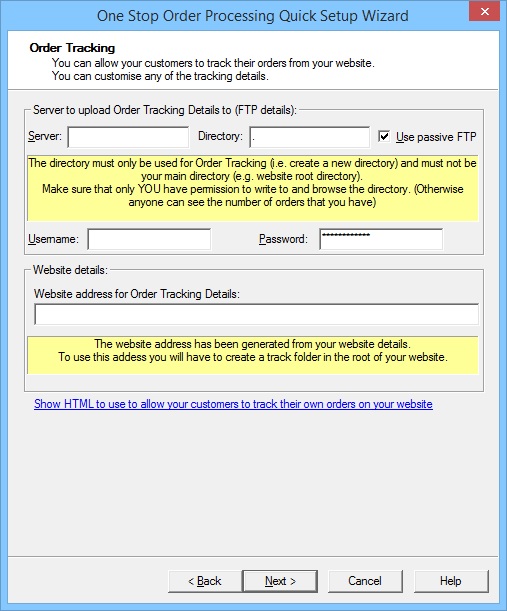
The final stage of the Quick Setup Wizard is where you can allow customers to track their orders from your website, here is where you will set up the information to upload the order tracking details.
Once the Quick Setup Wizard has been completed, you are ready to start importing and processing any orders. For help on how to set up an order import, click here.
5. Importing Orders
Orders can be manually imported into One Stop Order Processing using the exported orders file from the relevant internet site (e.g. ebay.co.uk). See Retrieving order information from selling channels on how to download the orders from the various supported selling channels.
One Stop Order Processing also allows you to automatically import and process orders with the various supported selling channels. This can help ease the process of importing orders into One Stop Order Processing and automate the order processes you would usually perform.
To import orders select the Import Orders menu option by either of the following ways:
- File->Import and Export->Import Orders
- Click on the Import Orders button (
)
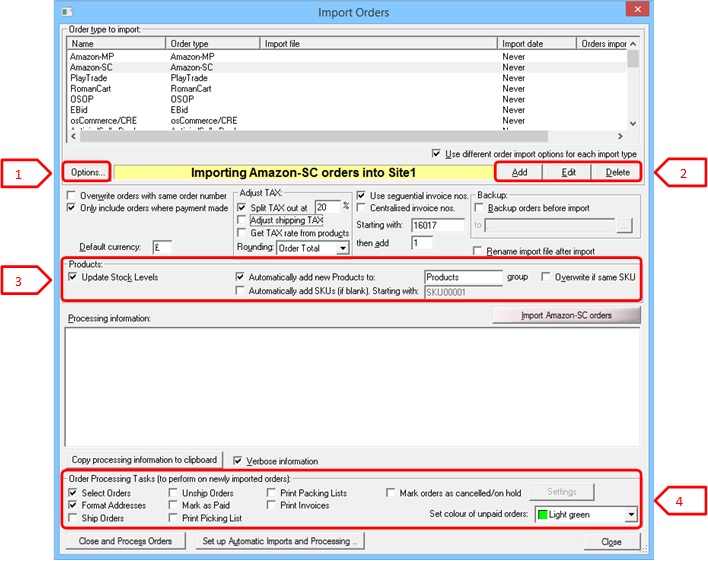
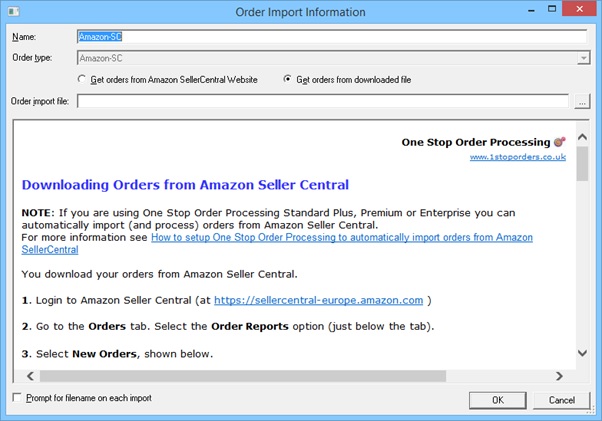
Once you click on the Import Orders button, you will be taken to the dialog above where you can set up the import types for the various supported selling channels, there are also a number of options you can apply to the imports such as VAT and stock control.
1) Options
When you have an import type selected, you can click on Options which will allow you to control how One Stop Order Processing uses the data from the selling channels such as handling VAT/TAX from orders.
2) Import buttons
Add - To add a new order import, you click on 'Add' where you will then select the import and be given instructions on how to retrieve the orders.
Edit - When you have one of the order imports selected, you can edit the order import information such as the name and order import file to use.
Delete - If you want to delete an import you have set up, select one in the 'Order type to import' box and click on the Delete button.
3) Products
When you import orders, you can set import to carry out different actions on products. For example if you are using stock control, there are various options available such as updating stock, automatically adding products and creating new SKU's.
4) Order Processing Tasks
When you import orders, there are various order processing tasks you can set to complete upon import. You can automatically get One Stop Order Processing to format addresses, marking the orders as shipped and printing packing lists of the orders. You can also set a colour of the unpaid orders that are imported to highlight them when processing orders.
Setting up a new import
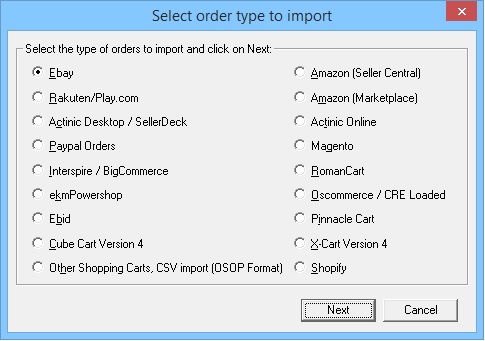
To set up a new order import, click on the Add button, this is where you can choose the order type to create an import for:
Here is where you select the sales channel you would like to set up an import for.
For Ebay, SellerDeck/Actinic, RomanCart, Amazon SellerCentral, CubeCart or OSOP custom import an Additional Import Options dialog appears where you can set extra options such as VAT splitting.
Once you have selected the selling channel, you will be taken to the following dialog where you select the order import file you have retrieved from your selling channel. This is also where you can set up the automated order import by linking your eBay or Amazon account. For more information on automated order import, click here.
See Retrieving order information from selling channels on how to retrieve the order files from the various supported selling channels.
5.1 Retrieving order information from selling channels
When you select the file to import order information you are shown how to retrieve the orders from the site selected.
You can give each import type a unique name. This is not used within the orders imported, but is used to make identifying the order type easier.
The following links show the details of how to import each type:
- Ebay
- Automatically importing from Ebay
- Amazon SellerCentral
- Automatically importing from Amazon SellerCentral
- Amazon Marketplace
- PlayTrade
- RomanCart
- osCommerce/CRE Loaded
- eBid
- One Stop (importing orders from other applications or products)
- Automatically importing OSOP orders
- CubeCart
- SellerDeck/Actinic
- Interspire
- XCart
- Magento
- ekmPowerShop
- Pinnacle Cart
- Shopify Cart
- Actinic Online/Oaxtis
- Paypal
If you want to automatically be prompted for a filename each time tick the Prompt for filename on each import.
5.2 Automated Order Import (This feature is available in Standard Plus, Premium and Enterprise versions of One Stop Order Processing)
We have added support for the automated import of orders for eBay, Amazon SC and Actinic/Sellerdeck.
You can automatically import and process orders from the supported selling channels.
This uses One Stop Automation; a tool that allows you to set
By setting a scheduler, you can put a time to when you want One Stop Order Processing to pull in orders from the selling channels
Automatically importing from Ebay
Automatically importing from Amazon SellerCentral
Automatically importing from Actinic/Sellerdeck sites
6. One Stop Order Processing overview
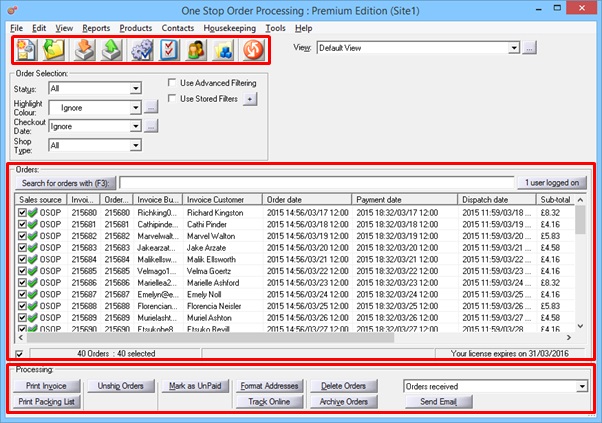
This is the main screen of One Stop Order Processing where you can complete all of your order processing tasks and view all orders imported.
This large orders section is where your orders will appear once they have been imported from your chosen selling channels.
New Order
If you accept telephone orders, mail orders or want to enter manual orders click on the New Order button. Open Site
You can create more than 1 site and process orders separately by changing the current site being used. This button allows you to select a different site to use. Import Orders
To import orders click on the Import Orders button, from here you will be able to set up an import for any of your selling channels. Export Orders
To export the details of all the orders (or selected orders), by clicking on the Export Orders button it will provide you with a list of 3rd party formats you can export to. Options
To access the options available click on the Options button. Customize Current View
You can configure which fields are shown at the top of the main orders screen by clicking on the Customize view button. Show Customers
You can view all of the customers by clicking on the Customers button. Product Management
One Stop Order Processing allows you to manage your products and stock across multiple selling platforms. You can amend, import and export product information and stock. To see your current products click on the Product Management button. Refresh
The refresh button is used when you have made changes to the view or have created any filters, you will want to click this button to apply any changes.
Order Processing buttons
There are various processing tasks that can be done by using the buttons located at the bottom of the main One Stop Order Processing screen. Once you have ticked the orders you would like to process, the following buttons can be used to process these orders:
Print Invoice This will print an invoice for the orders selected Ship Orders This button will mark the orders marked as dispatched on the system (For Standard Plus & Premium users, this will update the shipped status for the orders automatically on eBay and Amazon) Mark as UnPaid If you have an order that has not been paid for, you can use this button to mark the orders as unpaid. Format Addresses This will format the names and addresses for orders making sure the first letters are capitalized. Delete Orders This will delete the orders from the main One Stop Order Processing screen. (They will require purging after this to completely remove them from the system). Print Packing List This will print a packing list for the orders selected Track Online If you are using the tracking feature, this will allow you to create tracking details for the selected orders. Archive Orders You can archive orders to a different site if you do not want the orders to be in the current site.
Send Email This allows you to quickly send emails to selected orders to alert them of their orders being shipped/received or delayed.
Printing order details
If you want to print the current orders as they are shown select the Print Order View menu option (under File->Print menu option). If you have orders selected you will be prompted to see if you only want those orders printed or all the orders matching the current filter.
There are a number of printing options available in One Stop Order Processing.
There are various reports available in One Stop Order Processing that can be used and printed easily, these reports include:
- Stock - Current Stock Levels, Products Out of Stock, Products to Order, Stock Valuation
- Picking List - List of all items that need to be packed for groups of orders
- Sales - The reports can be used for stock management and valuation
- Profit - You can show how much profit you have for the selected orders
To view these reports, make sure your orders are selected and click on Reports in the tool bar; this will open the selection of available reports.
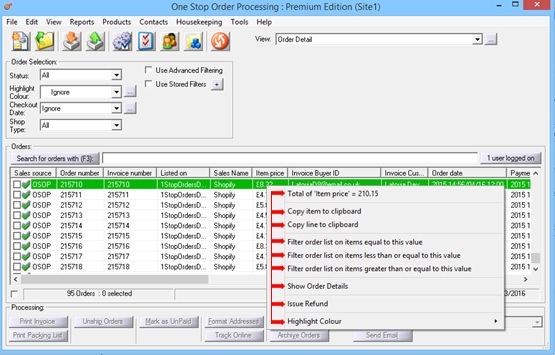
Right clicking on an order
When you right click on an order in One Stop Order Processing, there are various options available that you can use.
These consist of:
Total of figure This provides a total of the selected field (only applies to fields that are numerical) Copy item to clipboard This copies the field of the selected order Copy line to clipboard This copies the whole line of the selected order Filter order list on items equal to this value This creates a filter using the type of field selected and the order details. (I.e. clicking on a date will show orders that are equal to the date of the order selected) Filter order list on items less than or equal to this value This creates a filter based on the field selected and will show orders that are less than or equal to that value. Filter order list on items greater than or equal to this value This will create a filter showing a list of orders that are either greater than or equal to the ones Show Order Details This will open the order details dialog for the selected order Issue Refund This will allow you to make the refund for an order and will mark the order as refunded Highlight Colour This option allows you to set a colour to highlight the selected orders
7. Processing Orders
Example day of processing orders:
1) Import your orders into One Stop Order Processing
2) Set a filter to only show orders that are Not Shipped
3) Check order details if required (by right clicking on an order and selecting 'Show Order Details')
4) Select all orders to process and print a Picking List to view a list of all items that need to be packed for orders
5) Print the invoices for the orders processed
6) Export order information to a courier (if used)
7) Mark orders as shipped
8) Send Dispatch email
Displaying order details
You can display the current order details in any of the following ways:
- Double clicking the mouse on an order.
- Right click on an order and select the Show Order Details option.
Order details pages
Each order is made up of the following pages:
Customer details
Items ordered
Shipping
Memo
Order custom valuesProcessing orders
For each selected order you can print, preview, email the Invoice, Packing List or Purchase Order.
All the selected orders can also be marked as shipped, have their addresses formatted or the order tracking details published to a website for order tracking.
If you want to individually ship each item for an order (for example, if an order has 3 items and you only want to ship one of them), tick the 'Only include ticked order lines' option on the Display options.
If you are using this approach the order will only be marked as shipped, and be given a shipping date when all the order lines are shipped.
You can communicate with your customers by sending them emails to tell them what stage their order is at. Several default templates are supplied. You can amend these or create your own. Emails can be sent as HTML or plain text.
Options
Order Display
Invoice, Packing List and Purchase Order Options
Shipping
Printing Fields
Emailing
Track Online
Formatting Address
Company Details
Report Options
Other OptionsOrder status selection
You can select which orders to show based upon a variety of ways, for example, when the order was placed.
Status
This can be set to show orders only certain orders:
. Not shipped
. Paid and shipped (A complete order)
. Shipped
. Not paid or not shipped (And uncompleted order)
. Unpaid
. All orders
. Cancelled or On HoldOrder Tracking (This feature is available in Standard, Standard Plus, Premium and Enterprise versions of One Stop Order Processing)
Once order tracking has been setup (see the Track Online options for more information) you can select ¦any of your orders and upload their tracking information to your website. Customers can be sent an email which will automatically include a link to their order tracking information (on your website) and/or they can use an order tracking box on your website, where they type in their order number. You can then update (and upload) their tracking details to notify your customers of the order process.
You can change the information to display in the online tracking form. You can include details about the order and include up to 50 additional custom values specific to your business. This can include fields for you to add in comments or batch numbers or courier tracking, who packed by etc. You can also configure the tracking options.
8. Managing Products
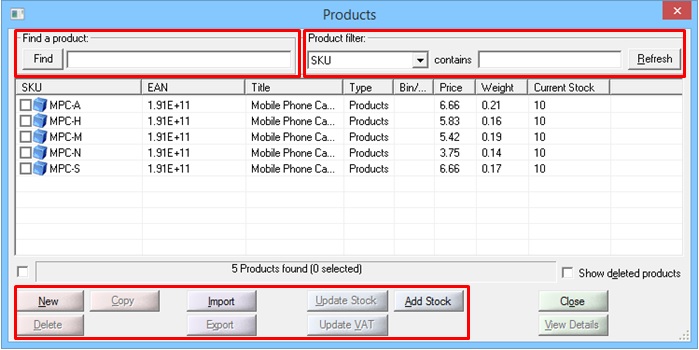
The following dialog is displayed to either show all the products or those available for selection.
You can find specific products by typing in the Find text area and clicking on the Find button. This will look in all fields for the products. You can also filter products on all of the main product details. This can be useful if your products are all listed by Suppler, Bin.Location or another common field (to your orders).
When you import orders, you can select the option to automatically add new products.
Products can be created in a number of ways:
1 'New' button. You are then shown the Product Details dialog.
2 'Copy' button. This copies the selected product and you're shown the Product Details dialog.
3 Automatically create products from imported orders. This is defined when you import orders.
4 Import products from a CSV file. You can update existing products with only the few required fields (e.g. to update the EANs or ASINS in all of your products).
5 Use the Products->Import->From Selected Orders menu option. If you already have products in your system you can create the products from the selected orders.Importing products
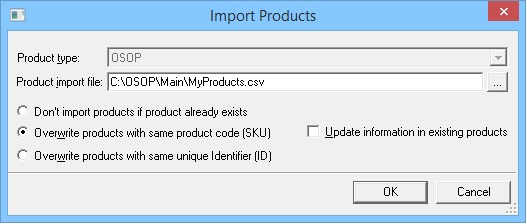
You can import products from a standard CSV file (details described below). When you click on the Import button you are shown the following dialog:
Options available for the import of products:
Don't import products if product already exists If you only want to import products that do not already exist tick this option. Overwrite products with same product code (SKU) If you tick this option, any of the products that already exist will have their details overwritten from those contained in the product import file. Overwrite products with same unique identifier (ID) If you tick this option if any of the products already exist they will have their details overwritten from those from the product import file. This option should be used if more than 1 product has the same SKU. Update information in existing products If this option is ticked (and the Overwrite products with same product code (SKU) is ticked) this will update any information that is included in existing products
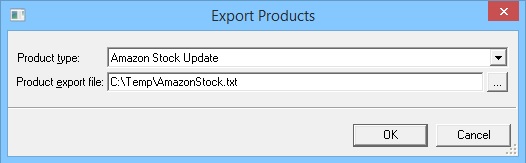
Exporting Products
You can use the Export button to take the products out of One Stop Order Processing into a CSV file. You can then manipulate your products in Excel before importing back in again (or importing to a 3rd party system).
You can export the information to the following formats:
Ebay Stock File
This exports in a format that can be imported into TurboLister. You can update the stock levels on Ebay.
AmazonStock File
This exports to a format that can be imported Amazon Seller Central with the current stock levels.
9. Managing Customers and Emails
9.1 Managing customers
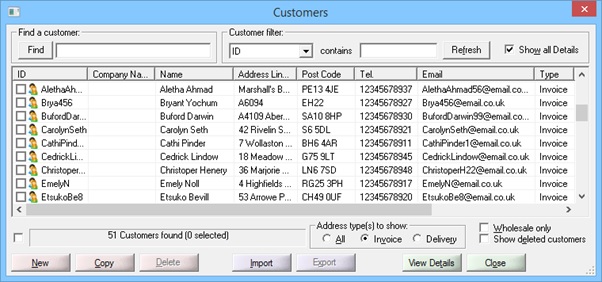
The following dialog is displayed to either show all the customers/suppliers or those available for selection (Example data used)
You can find a specific customer or supplier by typing in the Find text area and clicking on the Find button. This will look in all fields for the customers or suppliers. You can also filter customers or suppliers on all of the main customer/supplier details.
You can tick the Wholesale only option to show Wholesale customers. These are customers that have the Wholesale option ticked. This can be useful if you want to only show a subset of customers. To enable the Wholesale option for a customer if you select the customer and click on the View Details button.
Viewing orders for a customer (available in Standard Plus, Premium and Enterprise versions of One Stop Order Processing)
You can also view all the orders for a specific customer by selecting the required customer and clicking the right mouse button and selecting the Show Orders for this Customer's ID menu option. This will show all the orders for a customer from the same buyer ID.
Exporting customers
You can use the Export button to take the customers/suppliers out of One Stop Order Processing into a CSV file. You can then manipulate your customers/suppliers in Excel before importing back in again (or importing to a 3rd party system).
You can also use this facility to import customer/supplier details from other systems. The format of the CSV file is shown below:
For more information on how to import customers and the file format, click here.
9.2 Managing emails
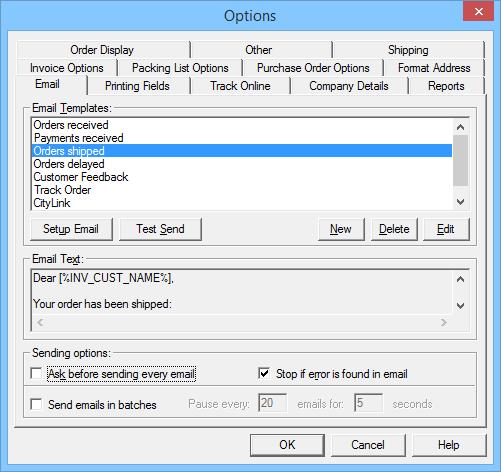
You can send emails to your customers based upon the selected orders. There are several templates supplied with One Stop Order Processing. These can inform your customers that the order has been received, payment has been received, order has been shipped and order has been delayed. You can amend the existing email templates or create your own by going to Tools->Options->Email tab and select the template you would like to change clicking Edit to open the invoice in a HTML editor.
Email Templates
When each template is selected the email text is shown in the Email Text area. It can be amended by pressing the Edit button. You can delete a template by pressing the Delete button. To create new blank templates press the New button.
To configure how the email will be sent click on the Setup Email button. For more information refer to the Setup Email section.
Once you are happy with your template you can send a test email to a specific email address. This would normally be your email address. The order details are filled in with example data.
By default, you are asked before every email is sent. If you want to turn this feature off you should un-tick Ask before sending every email.
NOTE: You should make sure that you have selected the right customers and correct template before sending any email. If you are unsure tick Ask before sending every email.
Sending emails in batches
If you have any problems with your email server (or ISP) when you send a large number of emails at once, you can limit the amount of emails sent at once. Tick the Send emails in batches option and select the number of emails to send at once and how long to wait between sending that number of emails. Normally a 5 second delay is sufficient to resolve any sending issues.
Creating and amending customer email templates
10. Exporting Order Details
To export all the orders (or selected orders) select the Export Orders menu option (under File->Import and Export) or click on Export Orders button (
).
The export feature allows you to use the order information that has been imported and export it in a format the 3rd party systems accept.
You can Export Order Details to other 3rd party systems including:
Amazon Shipping Confirmation
Ebay Shipping Confirmation
RoyalMail SmartStamp
RoyalMail Despatch Express
UKMail Consignor
QuickBooks
Sage
Post Office Proof of Posting
Royal Mail Depsatch Manager Online (DMO)
MetaPackFor more information on exporting order details, click here.
11. Support available
The Support Centre is where you can find all of our support tools including the knowledgebase and ticket submission. Click here to access the Support Centre.
Live support is available on our support site allowing you to be put straight through to one of our team if you need any help whilst using the software.
If you are looking to send in a ticket, this can be done on our support site. You can also track all previous tickets that have been raised so you wont lose out on any information you have been provided with.
We have an extensive knowledgebase available on our support site which provides you with guides and tips for the various features supported in One Stop Order Processing.
Click here to access the knowledgebase.
We recommend you take a look through the help available in our knowledgebase if you are looking for help on a feature or part of the software. If you cannot find what you are looking for, send a ticket to our support team detailing your query and they will get back to you as soon as possible.
We have a support team ready to help if required when using One Stop Order Processing. Support is available during normal business hours Monday to Friday.
Lite, Standard and Standard Plus users are provided with standard email support through our ticket system and live help is also available on our support site. We do not provide telephone support as a standard but if you feel that you need to contact us via telephone, we can arrange one to one training at a small fee.
Premium users are provided with priority email support through our ticket system, live help is also available to Premium users who wish to use it. Telephone support is included as a standard for Premium licence holders.
We have various support packages available to help you where required:
⇒ Telephone and priority email support can be purchased here.
⇒ One to one training for One Stop Order Processing can be purchased here.
⇒ If you require us to help set up your One Stop Order Processing system, click here.
⇒ If you would like us to review your system to see if you have streamlined it to maximize the efficiency, click here.
⇒ We can help set up and create customized views for One Stop Order Processing here.
⇒ If you are looking to import or export from a format not currently supported, click here.