One Stop Order Processing allows any view to be exported. To allow easy data conversion to the target system you can also define your own values. These can either contain a single value for all orders, or a different value for each order. These values can be defaulted from any other field and can include calculations based on other fields. For more information see Selecting Display Fields.
To export all the orders (or selected orders) select the Export
Orders menu option (under File->Import and Export) or click
on Export Orders button (![]() ).
).
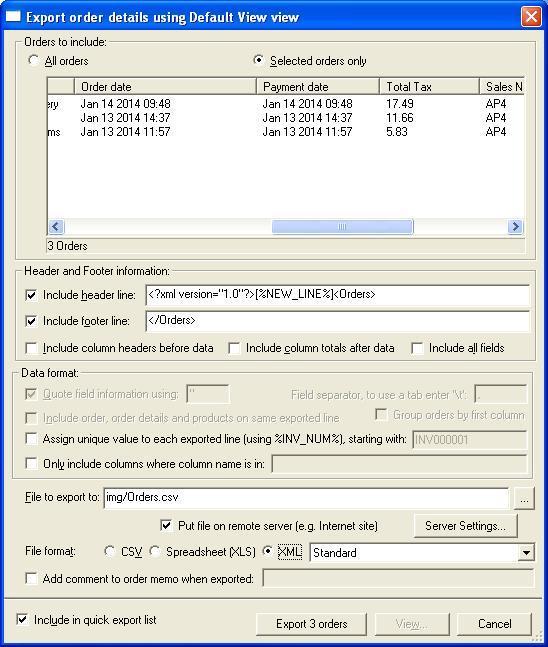
You can define how you want to export the information displayed on the screen. Only the fields (columns of data) that are marked for export are exported. The columns shown in the Export order details dialog are those that will be exported.
Orders to include
You can either export all the orders displayed shown
in the main window or those that you have ticked.
Include header line
If you require information at the start of the file
add any text here.
Include footer line
If you require information at the end of the file
add any text here.
The header, footer lines and filename can include the following macros. These are replaced when the information is exported.
| [%TIME%] | The current date and time. |
| [%DATE%] | The current date. |
| [%FILENAME%] | The filename exported to. |
| [%NUM_EXPORTED%] | Number of orders exported |
| [%SITE%] | The current site that orders are being export from. For example, website1. |
| [%NEW_LINE%] | Start a new line. This can be used to put several blank lines (with or without data in) at the start or end of the export file. You can also use the value %NEW_LINE% in a column's definition to export a newline (useful for some export formats). |
| [%TAB%] | Use a tab character. |
| [%BATCH_NUMBER%] | If this value is used in the filename a sequential number is used as part of the filename. This can be useful if the receiving location for the file expects every file to have a different name. |
| [%SINGLE_ORDER%] | If this value is used in the filename every file created will only have 1 order in it. For example, if you select 3 orders and use this option in the filename, 3 files will be created, each file having each of the 3 different orders in. NOTE: This option must be used in conjunction with the [%BATCH_NUMBER%] filename option (so that each filename has a different name). |
| [%ORD_NUM%] | The order number for this order. If used in conjunction with [%SINGLE_ORDER%] macro each file exported will have the order number as part of the name. |
Include column headers before data
Some 3rd party products want the names
of the fields that the information relates to. You can change the names of the
columns in the Select fields dialog.
Include column totals after data
You can include the totals of any columns defined
in the view as totals required.
Include all fields
When exporting orders ignore any column specific information about not exporting
the column. This is useful when you want to export all the order data from the
OSOPExport view. This will also include the original column names, rather than
any new names that have been entered.
Quote field information
If you are using the separator in your main text
you may want to use quoted fields. For example, some applications (e.g. Microsoft
Excel) allow the comma separator to be used as field text as long as all the
fields are quoted. You can use any character(s) to put around the export field
information.
Field separator, to use a tab enter \t
This is the character (or characters) to use between
each value. If you need a Tab Separated file (tsv) type in \t. You can also use %NEW_LINE% if you want a new line after each field.
Include order, order details and products on same exported line
If you want to export order details and the orders have more than 1 item per
order you can tick this option to include all the order details on the same
line. This feature for using fulfillment houses (drop shipping).
If you tick this option any details that relate to the items ordered or product
details are added onto the end of the order. For example, if you add the field
Item ID and Item title on the end of the fields to export, additional fields
will be exported onto the end of the main order for these items.
Group orders by first column.
You can export the orders in groups. For example, a day's orders or all orders of a certain type. When exporting the first field included is looked at and when its value changes a new group is started. If you tick the 'Include field total in export' option on the field details (in the Customize view dialog) then when this field is exported all values in that group are added up. For example, if the Grand Total column has this option ticked (the 'Include field total in export') the line exported for the group will contain the total for all orders in the group.
Assign unique value to each exported order line (using %INV_NUM%)
If you want to have a value exported for each line that is sequential tick this option. This is useful when you are exporting to accounting packages where a sequential order number is very useful. You can use the automatically created invoice number (created when orders are imported). However, if you don't export all these orders or you are using the Group Orders by first column option there will be gaps in the invoice numbers. Even if you use the %INV_NUM% multiple times on the same exported line its value will only increased after that line has been exported. If a certain line does not contain the %INV_NUM% macro the value will not be increased.
Only include columns where column name is in:
If you want to display a lot of fields, but only export some of them tick this option. This is very useful if you want to find orders based on location, name or amount but don't want to export this information. You should include the name of the column to export in the field with a # around the column name. This is used incase some column names are part of other names (e.g. Detail and More Detail).
For example, if you want to export the columns Order Number, Date Ordered and Invoice Company (but display more fields) enter a value of #Order Number#Date Ordered#Invoice Company#.
File to export to
This is the file that will be used to save the information
to. This file will be overwritten each time an export is done.
If you want to put the file onto a remote server you should put in the remote folder that it will be stored in. For example, files/orders.xml. This will put the file orders.xml into the folder files on the remote server.
NOTE:
If you are storing the file on a remote server you should click on the Server Settings button (described below).
File format
You can export the orders into a CSV, XLS (Excel spreadsheet format) or XML (Extensible Markup Language)
XML files
For XML files, by default, a single level (group) is created (called Orders). To change this amend the value in the Header and Footer text. If your XML format needs additional elements (folders) you can add these by using Custom Fixed fields with a default value of XMLOPEN and another field with a default value of XMLCLOSE to close the element (group). Using this approach you can create XML files with multi-level element hierarchies. To open another element within an existing element create another Custom Fixed field with a value of XMLOPEN. You MUST create a Custom fixed field with a value of XMLCLOSE for the same element before creating an XMLCLOSE field fot eh parent field.
NOTE :
If there are fields that you want all values to be shown for where an order has more than 1 order line (e.g. SKU or price) you need to put a <ML> tag before the value. For example, to export all the SKUs for an order set the default value for the field to export to be <ML>[%SKU%].
There are various file formats. For normal CSV files select Standard. For specific
formats, they are listed in the box on the right, for example, RoyalMail Despatch
Express.
Add comment to order memo when exported
You can add text to the order's memo/notes when the order is exported. This
can be useful to see if an order has been exported.
Include in quick export list
When you click on the Export Orders button a list of views to export to is shown. If you tick this option, this view will appear in the quick export list.
Server Settings
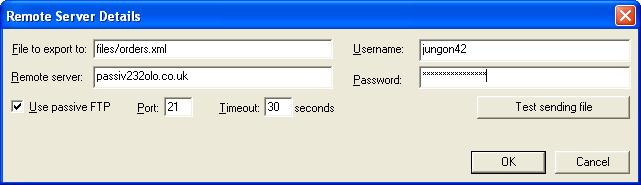
You can setup the remote server to put the file onto. The file is transferred using a standard FTP account. The default settings (for passive FTP, Port and Timeout) are normally correct for most FTP servers.
File to export to:
This is the file to export the file to, including the remote folder.
Remote Server
The server name. This would normally be the website name or IP address.
Username
The username, if required to be able to access the remote FTP server
Password
The password for the FTP account.
Use passive FTP
Some servers accept both protocols. If the file does not upload with this option ticked, untick this option.
Port
Most FTP servers use port 21. However, some servers can use a different port. If the default does not work, consult with your network administrator to see which port whould be used.
Timeout
The amount of time (in seconds) that One Stop Order Processing will try and contact the server. When you are testing you should set this to a low number (e.g. 10 seconds).
Test sending file
When you first put in the server settings you should click on this button. This will try and put a test file on your server (and remove it again). Any problems will be shown to you.
NOTE: When you store the files on a remote serveryou should check what the default folder that has been setup when logged in (from the given acount). This folder is normally setup when the FTP account is created.
Using SFTP (to send files to an SFTP server)
This uses WinSCP, a free SFTP client (https://winscp.net/eng/index.php)
1. Setup the details as normal for a standard FTP server.
2. In the File to export change the name from
filename
to
{SFTP}{"C:\Program Files (x86)\WinSCP\WinSCP.exe" /log="C:\OSOP\Main\SFTPLog.txt" /ini=nul /script="[SCRIPT]"}{C:\OSOP\Main\SFTPScript.txt}{filename}
This will use a defined script
C:\OSOP\Main\SFTPScript.txt
This script has the contents
open sftp://[LOGINNAME]:[LOGINPW]@[SERVER]
put [LOCALFILE]
exit
This will use the values setup in the Remote Server Details and can be changed, if needed, for any additional details or commands (e.g. chdir exportfolder).
Include the filename already specified as the last parameter
NOTE: If the SFTP needs more authentication you should include these in the server given in the server settings. For example,
some servers need extra authentication with the encryption key. This can be passed in as the host name. For example, set the hostname to
pluggep/ -hostkey="ssh-rsa 2048 ZIxRbE0hjd8klPoelGLpAFQbk8Klop(7hYRXjuN40fw="
This will logon to the pluggep server in the root folder and use the key ZIxRbE0hjd8klPoelGLpAFQbk8Klop(7hYRXjuN40fw=
You will need to install WinSCP in the default location, C:\Program Files (x86)\WinSCP. From https://winscp.net/eng/index.php
1 Setup your import file as normal
2 Change the Order file to include the following line
{SFTP}{"C:\Program Files (x86)\WinSCP\WinSCP.exe" /log="C:\OSOP\SFTPLog.txt" /ini=nul /script="|SCRIPT|"}{C:\OSOP\Download.txt}{orders.txt}
NOTE: the last field, {orders.txt} is the file to download from the remote server
3 You need to create c:\OSOP\Download.txt file. This contains the script to run on the remote server. You need to add in the necessary security details.
An example of an FTPS server
open ftps://[LOGINNAME]:[LOGINPW]@[SERVER] -explicit -certificate="04:3f:0a:24:b3:2e:cc:bc::78:b9:1a:53:34:da:f1:5d:ac:49:70:6a:85:ff:a8:35:fa:23:cd:32:de:ca:63"
put [LOCALFILE]
exit
An example of a SFTP server
open ftps://[LOGINNAME]:[LOGINPW]@[SERVER] -hostkey="ssh-rsa 2048 WhjMMLWz0SRojjshf8LOKS64lX5h7efw1SX+K9a4="
put [LOCALFILE]
exit
NOTE: You should leave the [LOGINNAME], [LOGINPW], [SERVER] and [LOCALFILE] values as these are filled in by OSOP.
When this is run, the file C:\OSOP\SFTPLog.txt , is created. This contains the replies from the remote FTP server. This can be used to resolve any issues found.

You will need to install WinSCP in teh default location, C:\Program Files (x86)\WinSCP. From https://winscp.net/eng/index.php
1 Setup a new export or amend an existing export.
2 At the bottom of the export dialog click on the Server Settings... button.

3 Add in the file to export to include the {SFTP} code. This will instruct OSOP to use an external program to use SFTP or FTPS. For example,
{SFTP}{"C:\Program Files (x86)\WinSCP\WinSCP.exe" /log="C:\OSOP\SFTPLog.txt" /ini=nul /script="|SCRIPT|"}{C:\OSOP\Upload.txt}{customers.csv}
NOTE: the last field, {customers.csv} is the file to upload to the remote server
4 You need to create c:\OSOP\Upload.txt file. This contains the script to run on the remote server. You need to add in the necessary security details.
An example of an FTPS server
open ftps://[LOGINNAME]:[LOGINPW]@[SERVER] -explicit -certificate="04:0f:0a:95:e9:2e:cc:bc:8b:5a:b9:1a:53:cb:da:ff:5d:ac:49:70:6a:98:2a:a8:35:fa:23:cd:52:de:ca:63"
put [LOCALFILE]
exit
An example of a SFTP server
open ftps://[LOGINNAME]:[LOGINPW]@[SERVER] -hostkey="ssh-rsa 2048 WhD3FWz0SRo8kj*umjv+x3qdS64lX5h7efw1SX+Kzas="
put [LOCALFILE]
exit
NOTE: You should leave the [LOGINNAME], [LOGINPW], [SERVER] and [LOCALFILE] values as these are filled in by OSOP.
When this is run, the file C:\OSOP\SFTPLog.txt , is created. This contains the replies from the remote FTP server. This can be used to resolve any issues found.
