One Stop Order Processing

One Stop Order Processing |
|
How to share One Stop Order Processing orders over the internet
This feature is available in Professional, Premium and Enterprise versions of One Stop Order Processing
If you are using One Stop Order Processing (OSOP) at 2 different locations you can copy the orders from one of the physical locations to the other over the internet. The following article shows how to set up One Stop Order Processing so that any orders imported or entered into the main OSOP automatically appear at the other location. You will need a remote location, accessible by the internet at both locations, to store the encrypted order details. The details are transferred using a standard FTP account.
NOTE:
The current version only supports 1 way synchronization. It does not support synchronization from both OSOP locations. This will be available in a future release.
Setup for Main (Master PC)
You export the orders from the Master PC (the PC that you can change orders on). If you are using OSOP on more than 1 PC on your network (e.g. 5 users) it is advisable to export the orders from the main (server) PC. This would normally be the PC that orders are imported into (e.g. from Ebay and Amazon).
1 Install the software on the PC.
2 Run One
Stop Order Processing.
3 Select the number of orders that you want to update on the remote PC(s), for example 7 days (select Last 7 days in the Date filter).
4 Click
Refresh.
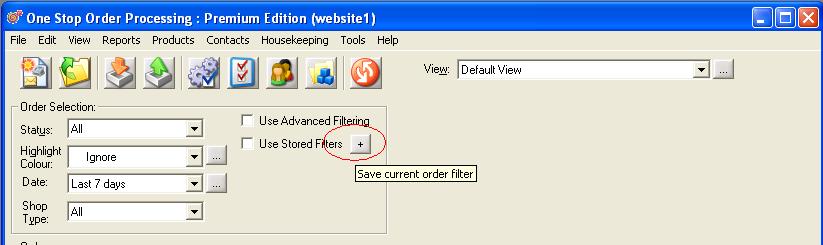
5 Click on the + button next to the Use Stored Filters button, shown below:
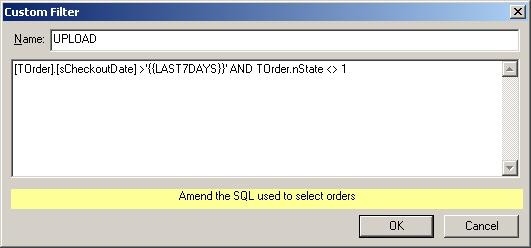
6 This will display the Custom Filter dialog. Change the Name to UPLOAD. Change the date shown to be the macro {{LAST7DAYS}}. In this example use the filter:
[TOrder].[sCheckoutDate]>'{{LAST7DAYS}}' AND TOrder.nState <> 1
This is shown below:
7 Click on OK.
8 Select the information fields that you want to export to the remote PCs. You should create a new view (click on the Customize Current View icon (![]() )
).
)
).
9 Click on the New button.
10 Type in the name of the new view, for example, OrderExport and click on OK.
11 Add in all the fields that you want to export information for. Normally this would be customer name, address, what they ordered etc.. Click on OK.
12 Select the View->Change Export Options menu option. This will display Export options.
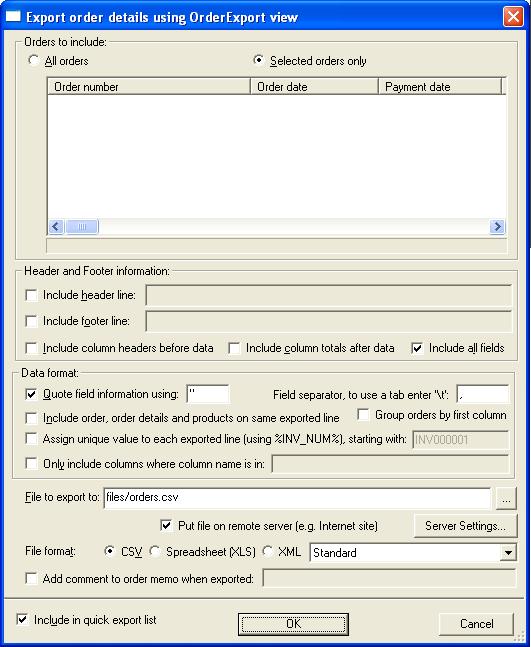
13 Select Selected orders only.
14 Tick Include all fields.
15 Make sure Quote field information using is set to " and Field separator is set to ,.
16 Change the file to export to be the remote folder and filename. For example,
files/orders.csv. This will use the remote folder files and put a file in the folder called orders.csv.
17 Tick Put file on remote server (e.g. Internet site).
18 Make sure CSV format is selected. This is shown below:
19 Now setup details of the remote server. Click on the Server Settings button.
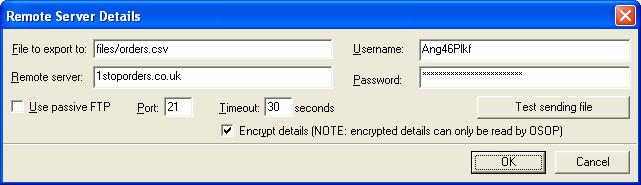
20 Fill in the following information in the server details:
| Name | Remote Orders |
| Order File | orders.csv If you are putting the file in a folder at the remote FTP location put the folder name before the name. For example, files/orders.csv means put the orders.csv file into the remote folder files. |
| Remote server | Remote server, or internet site name. For example, 1stoporders.co.uk |
| Use passive FTP | Leave unticked unless when you test the file transfer it fails. |
| Port | Leave at 21 unless there is a different port used FTP transfers on the remote server |
| Timeout | Leave at 30 seconds unless the remote server has a very slow connection. |
| Username | Username for ftp account to retrieve the orders with |
| Password | Password for FTP account |
| Encrypt details | Tick this option. This will make sure that details put on the server are encrypted (and compacted). This makes sure that the data is secure and is transferred quickly. |
This is shown below.
21 Close One Stop Order Processing.
22
Start Automation for One Stop Order Processing (from the Start menu or desktop shortcut).
23
Click on the Options button
24
Click on New to create a new task
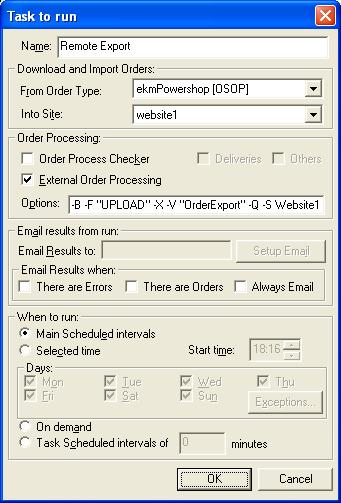
25
Enter a name for the task. For example, Remote Export
26 Tick External Order Processing and put in the following line
C:\OSOP\Main\IL_OSOP.exe -B -F "UPLOAD" -X -V "OrderExport" -Q -S Website1
This will run One Stop Order Processing and use Website1, select the Upload filter and select the OrderExport view and export the orders to the remote site and close One Stop Order Processing.
This screen is shown below:
There is more information on using One Stop Order Processing from the command line here.
27 Click on OK.
28 You will need to leave Automation for One Stop Order Processing running so that order can automatically be exported every 10 minutes.
29 You can tick Hide from Windows task bar on the main window to make sure it isn't shown.
30
By default, you can export orders every 10 minutes, you can adjust this in the Scheduler Options. You can also amend the task to only export orders at a certain time of day, if requried. Click on the F1 button on the keyboard in Automation for One Stop Order Processing to see the Help and how to adjust the various task settings.
Setup for remote PC
You can import the orders into any number of remote One Stop Order Processing PCs.
1 Install the software on the PC
2 Click on the Import Orders button ( ![]() )
)
3 Click on the Add button to add a new import type.
4 Select the Other Shopping Carts, CSV import (OSOP format) and click on Next
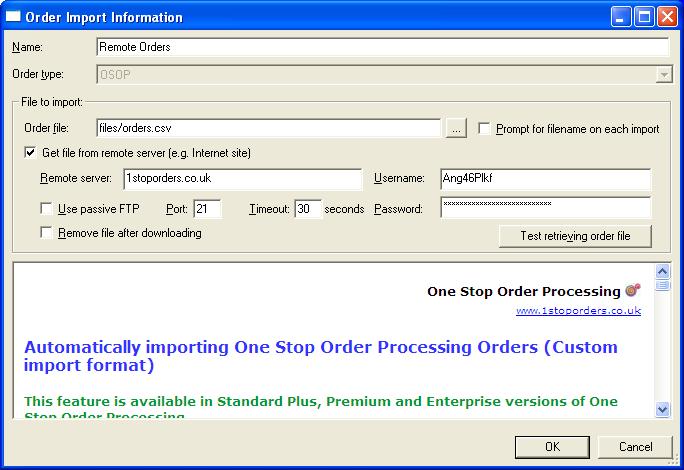
5 In the Order Import Information enter the following information
| Name | Remote Orders |
| Order File | orders.csv If you are putting the file in a folder at the remote FTP location put the folder name before the name. For example, files/orders.csv means put the orders.csv file into the remote folder files. |
| Get file from remote server | Tick this option |
| Remote server | Remote server, or internet site name. For example, 1stoporders.co.uk |
| Use passive FTP | Leave unticked unless when you test the file transfer it fails. |
| Port | Leave at 21 unless there is a different port used FTP transfers on the remote server |
| Timeout | Leave at 30 seconds unless the remote server has a very slow connection. |
| Remove file after downloading | Tick this option if only 1 PC is sharing the order details. |
| Username | Username for ftp account to retrieve the orders with |
| Password | Password for FTP account |
An example screen is shown below
6 When you have entered the information click on the Test retrieving order file button to make sure the information is correct. Any errors are shown on the screen.
7 Click on OK.
8 On the OSOP options dialog shown select the DD-MM-YY date format
9 Setup any VAT settings. For example, this is shown below:
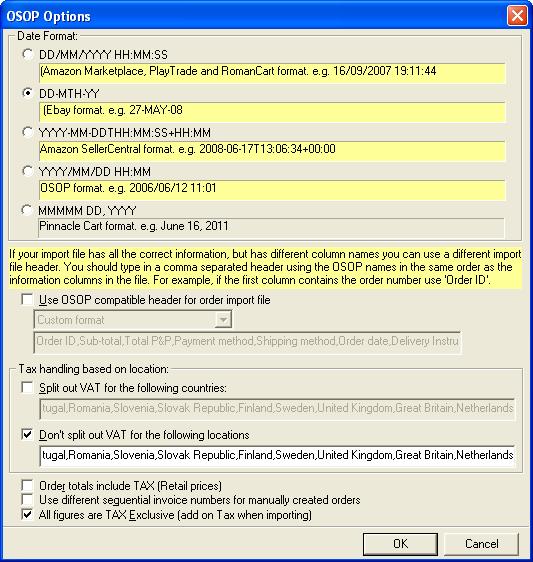
10 Click on OK
11 In the Import Orders and the new Remote Orders Import type selected make sure that Overwrite orders with same order number is ticked (and also User different order import options for each import type is ticked)
12 Close the Import Orders dialog.
13 Close One Stop Order Processing.
14 Start Automation for One Stop Order Processing (from the Start menu or desktop shortcut)
15 Click on the Options button
16 Click on New to create a new task
17 Enter a name for the task. For example, Remote Import
18 In the Download and Import Orders section tick Download and Import Orders and select the Order Type of Remote Orders and Into Site as the site you want the orders imported into. This is shown below:
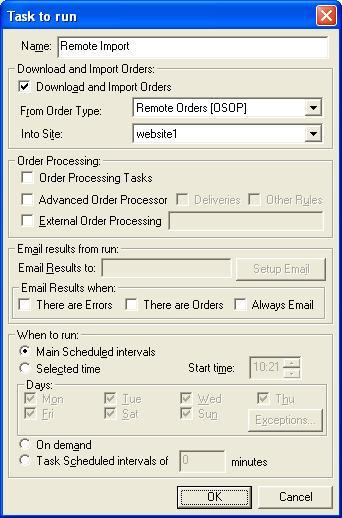
19 Click on OK.
20 You will need to leave Automation for One Stop Order Processing running so that order can automatically be imported every 10 minutes.
21 You can tick Hide from Windows task bar on the main window to make sure it isn't shown.
22 By default, you can import orders every 10 minutes, you can adjust this in the Scheduler Options. You can also amend the task to only import orders at a certain time of day, if requried. Click on the F1 button on the keyboard in Automation for One Stop Order Processing to see the Help and how to adjust the various task settings.
One Stop Order Processing allows you to import and process orders for Ebay, Amazon, SellerDeck, Shopify, Magento, osCommerce, BigCommerce, RomanCart, eBid, XCart, Oxatis, Groupon, Wowcher, Paypal, Cdiscount. ekmpowershop, Etsy, Flubit, OpenCart, PinnacleCart, PrestaShop, WooCommerce, Weebly, ChannelAdvisor, ASOS Marketplace, OnBuy, Mighty Deals , Mail Order and Telephone Sales
Mole End Group of Companies |
|||||
| Products, plugins and utilities for SellerDeck | All your orders, from all your systems, all together in one simple-to-use application | Integrated label invoice paper and free software packages and templates. Print your invoice and labels at the same time | Print Amazon Despatch Notes with a peel out label with the customer's details on directly from Amazon | Print Ebay Invoices with a peel out label with the customer's details on directly from Ebay | |