One Stop Order Processing

One Stop Order Processing |
|
When you print invoices and packing lists you can pickup the standard order
information using the macros defined in the Invoice
and Packing List Options.
In addition to these macros you can define others. These are replaced with the
values just before printing. A macro can contain company information defined
in the Company Details options. You can
also display different values for different field values. This can be used to
display a different PPI (1st or 2nd class) based upon the shipping choice. This
is explained at the end of this section.
Several default Macros are defined. These provide information to be put into the default invoice and packing list templates. You can also change the order that macros are processed. This allows you to change the values based upon certain criteria. For example, you may want to show a certain image if the Listed On is Ebay, but if the address is in France change the image to something else.
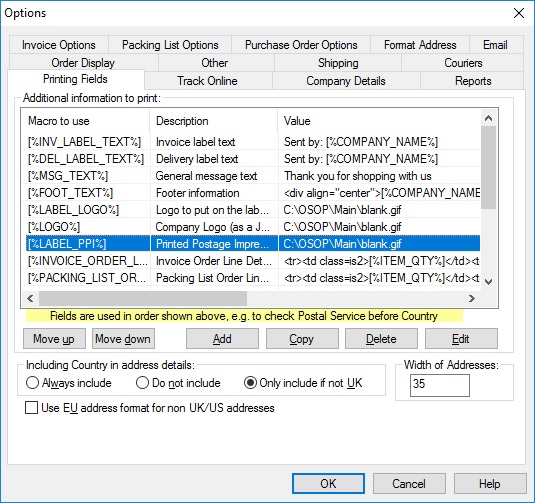
Macros Provided
Several macros are provided, shown below. These are used in the supplied invoices, packing slips and purchase orders.
| Macro name | Description |
| [%INV_LABEL_TEXT%] | The text to place at the bottom of the invoice label (e.g. Your return address) |
| [%DEL_LABEL_TEXT%] | The text to place at the bottom of the delivery label (e.g. delivery instructions, using the macro [%DELIVERY_INSTRUCTIONS%]) |
| [%MSG_TEXT%] | The message to put at the end of the order details (e.g. Thank you for shopping with us) |
| [%FOOT_TEXT%] | The text to appear at the bottom of the invoice/packing slip etc. This is a good place to out your company information (e.g. VAT number, address, phone number) |
| [%LABEL_LOGO%] | The image to display on the labels. This is normally a small logo |
| [%LOGO%] | The image to put on the main invoice. This can reference your main website logo |
| [%LABEL_PPI%] | The PPI to put onto the label. This can be automatically generated when opening the macro |
| [%EMAIL_SENDER_NAME%] | Name of sender to use in emails. You need to add this macro into the email settings. More information in the Setting Up Email section |
| [%EMAIL_REPLY_ADDRESS%] | Email address to use as reply address for emails sent. You need to add this macro into the email settings. More information in the Setting Up Email section |
[%INVOICE_ORDER_LINES%]
|
Macro used to define how orders are displayed in invoices. These can be changed to include additional information or remove information not required. |
| [%INVOICE_ORDER_LINES_WITH_IMAGE%] | Macro used to define how orders are displayed in invoices. These can be changed to include additional information or remove information not required. |
| [%INVOICE_ORDER_LINES_WITH_LEFT_IMAGE%] | Macro used to define how orders are displayed in invoices. These can be changed to include additional information or remove information not required. |
| [%INVOICE_ORDER_LINES_MINI%] | Macro used to define how orders are displayed in invoices. These can be changed to include additional information or remove information not required. |
| [%INVOICE_ORDER_LINES_NO_TOTAL%] | Macro used to define how orders are displayed in invoices. These can be changed to include additional information or remove information not required. |
| [%PACKING_LIST_ORDER_LINES%] | Macro used to define how orders are displayed in packing list. These can be changed to include additional information or remove information not required. |
| [%PACKING_LIST_ORDER_LINES_MINI%] | Macro used to define how orders are displayed in mini packing list printed with courier labels. These can be changed to include additional information or remove information not required. |
NOTE: You can create your own macros by clicking on the Add button and entering your own macros. These macros can then be used in Invoices, Packing Lists, Ourchase Orders and Emails. Macros can also reference other fields or include formulae (see Invoice, Packing List and Purchase Order Options in the Advanced Macros section for more details).
Including Country on address details
When you use an address macro ([%INV_ADD%], [%DEL_ADD%] or [%%SUPPLIER_ADDn-n%%] you can choose to include the country name for the UK. Use either the Always include, Do not include or Only include if not UK option.
Width of Addresses
When either the
([%INV_ADD%], [%DEL_ADD%] or [%%SUPPLIER_ADDn-n%%] macros are used you can set the maximum width of a line in the address. If the address line is greater than the width given it is moved onto the next line of the address.
Use EU address format for non UK/US addresses
If you want to use the EU format for non UK and US addresses tick this option.
You can edit or delete the existing macros. You can also add your own macros. If you add or edit a macro you are shown the following screen.
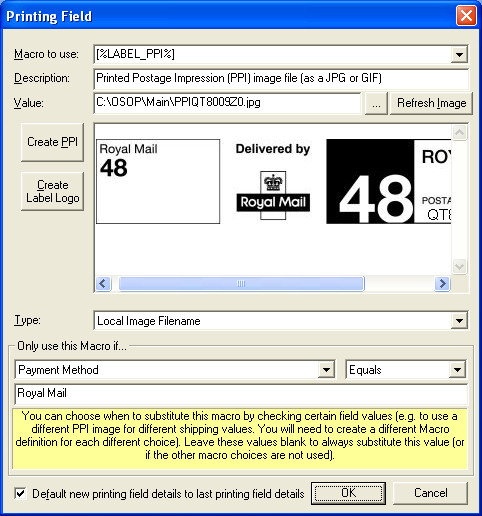
Macro to use:
The text that appears in the Invoice or Packing List. If this appears the Value
is replaced. You can enter your own macro names if required (you will need to
add the values to the Invoices etc.)..
NOTE: These macros can also be used in Emails and Online Tracking.
If you are using the Macro [%LABEL_PPI%] you can create a PPI image by clicking on the Create PPI button. When you do this you are shown the following dialog:
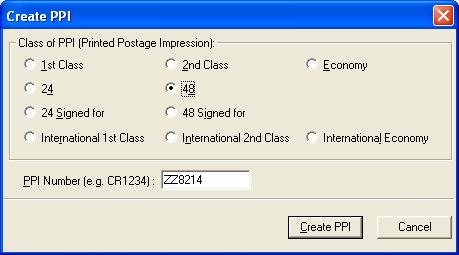
Select 1st, 2nd, Economy, 24, 48, 24 Signed for, 48 Signed for, International, International 2nd Class or International Economy class and type in the code given to you by the RoyalMail. When you click on Create PPI the image will be created anda asigned to the Macro.
Description:
The description of the macro. Default macros are created. You can also add your
own. Use text that is meaningful to the person entering values.
Value:
The value that will be used when replacing the Macro. This can be text or a
text, html or image file.
Text
The Macro is replaced by the text. NOTE: The Value can contain other
Macros. For example, Ebay Info:[%FEEDBACK_LEFT%], [%FEEDBACK_RECEIVED%].
Local Filename
If the filename is an image file the file is displayed. If the file ends with
.txt, .html or .htm the file is copied into the Invoice or Packing List. This
can be useful for standard information, for example, your terms and conditions.
When you are using images from files and are using a networked version of One
Stop Order Processing you should make sure that the files are available on your
network. A good way to do this is to put your files into your C:\OSOP\Main directory
(folder) and reference the files using the network path. An example of how to
do this is described below:
| 1 | Install the software into the default location on the main PC, C:\OSOP. In this example the main PC is called SERVER. Replace the name SERVER with your main PC's name. |
| 2 | Share the main directory C:\OSOP as OSOP (see Change Site for more details on how to do this) |
| 3 | Put all of your images to use in invoices etc. into C:\OSOP\Main (e.g. put logo.jpg into C:\OSOP\Main). |
| 4 | When using any files as Macros (e.g. logo.jpg) use \\SERVER\OSOP\Main\logo.jpg. |
Internet Filename (weblink)
This is an image on a website (.gif, .jpg, .jpeg, .png). For example your company
logo. It is a good idea to use an image from a website if you are using this
for sending emails as the image will not be attached to an email, but a website
link will be displayed.
Only use this Macro if:
If you only want to use this macro value under certain conditions you can use
this option. You can test a particular value of the order being printed. You
can also use other conditions (e.g. Grand Total is more than a certain amount,
or country is not france)
You can also select how you want to compare the value by selecting the appropriate choice from the list to the right of the field to test, described below:
| Greather than | Use this macro if the value is greater than (or equal to) that given. For example, 12.52 means include these details if the value is greater than or equal to £12.52 (the currency is not needed). | |
| Less than | Use this macro if the value is less than (or equal to) that specified. For example, 1 means only display the text (or image) for values of 1 or less. | |
| Equals | Use this macro for exact values. For example, 100 means only display for values of 100. | |
| Not Equals | Use this macro when you want to include the text or image for values that are not equal to that given. For example, 5 means show the text or image for all values except 5. France means is not France. | |
| Starts with | For text fields you can choose to select the first few characters of a vallue, for example, Royal would select all orders that start with Royal (e.g. Royal Mail First Class and Royal Mail Second Class) | |
| Ends with | For text fields you can choose to select the last few characters of a vallue, for example, Discount would select all orders that end with Discount (e.g. Ebay Discount and Amazon Discount) | |
| Contains | For text fields you can select all orders that have a certain word, for example, Safe, would select any orders with the word safe in a certain field (e.g. Leave safe and Please put safe in shed). | |
| Before | For any date fields this will select all orders after the date given. The format of any dates uised shoud be YYYY/MM/DD HH:MM (e.g. 2015/08/23 10:15) or DD MMM YYYY HH:MM (e.g. 23 Aug 2015 10:15) | |
| After | For any date fields this will select all orders before the date given. The format of any dates uised shoud be YYYY/MM/DD HH:MM (e.g. 2015/08/23 10:15) or DD MMM YYYY HH:MM (e.g. 23 Aug 2015 10:15) | |
| Year | For any date fields this will select orders that are in the same year as that given. The year is in the fotm YYYY (e.g. 2015) |
You can use single values, listed below or 2 conditions at once (i.e. AND).
The conditions listed below with an AND should have the 2 values to be checked
together separated by an AND. For example, if you wanted to use a certain PPI
for the UK and 1st Class you would select Postal
Service AND Delivery Country and have a value of First
Class AND United Kingdom.
NOTE: Rather than using AND you can also use &&,
+ or || to
separate the 2 values.
The values to check are:
Postal Service
Delivery Country
Invoice Country
Payment Method
Shipping Instructions
Postal Service AND Delivery Country
Postal Service AND Listed On
Invoice Name
Invoice Company
Invoice Telephone No.
Invoice Fax
Invoice Email
Invoice Address Line1
Invoice Address Line2
Invoice Address Line3
Invoice Address Line4
Invoice County
Invoice Postcode
Invoice Buyer ID
Delivery Name
Delivery Company
Delivery Telephone No.
Delivery Fax
Delivery Email
Delivery Address Line1
Delivery Address Line2
Delivery Address Line3
Delivery Address Line4
Delivery County
Delivery PostCode
Delivery Buyer ID
Sales Source
Sales Name
Sales Num
SubTotal
Total Tax
Total PnP
Total PnP Tax
Insurance
Insurance Tax
All Total Tax
Grand Total
Order Date
Checkout Date
Payment Date
Dispatch Date
Invoice Date
Invoice Number
Feedback Left
Feedback Received
Notes
Listed On
Transaction ID
Order ID
Currency
VAT Number
Paypal ID
Purchase OrderNum
Weight
Custom Value 1
Custom Value 2
Custom Value 3
Custom Value 4
Custom Value 5
Custom Value 6
Custom Value 7
Custom Value 8
Custom Value 9
Custom Value 10
Custom Value 11
Custom Value 12
Custom Value 13
Custom Value 14
Custom Value 15
Custom Value 16
Custom Value 17
Custom Value 18
Custom Value 19
Custom Value 20
Custom Value 21
Custom Value 22
Custom Value 23
Custom Value 24
Custom Value 25
Custom Value 26
Custom Value 27
Custom Value 28
Custom Value 29
Custom Value 30
Custom Value 31
Custom Value 32
Custom Value 33
Custom Value 34
Custom Value 35
Custom Value 36
Custom Value 37
Custom Value 38
Custom Value 39
Custom Value 40
Custom Value 41
Custom Value 42
Custom Value 43
Custom Value 44
Custom Value 45
Custom Value 46
Custom Value 47
Custom Value 48
Custom Value 49
Custom Value 50
If you wish to use your own order processing procedures you can use the custom order values
Example 1, how to use a different PPI for orders.
If you define the 3 following macros, you can display a different PPI for 1st
Class, 2nd Class and nothing for international orders.
| Macro Name | Value | Only use this Macro if... | equals |
| [%LABEL_PPI%] | RoyalMail1stPPI.jpg | Postal Service | 1st Class |
| [%LABEL_PPI%] | RoyalMail2ndPPI.jpg | Postal Service | 2nd Class |
| [%LABEL_PPI%] |
Example 2, how to display additional text on the packing list or invoice for
certain orders
If you define the following macro, you can display a Please send Special Delivery
(in bold) on the packing list for orders that have a value more than £10.
You will also need to add the text [%EXTRA_SHIPPING_TEXT%] to the Packing List
(or Invoice).
| Macro Name | Value | Only use this Macro if... | Greater than |
| [%EXTRA_SHIPPING_TEXT%] | <B>Please send Special Delivery</B> | Grand Total | 10 |
Default new printing field details to last printing field details
If you are creating a Printing Fields with slightly different details you can tick this option to default all values from the last Printing Fields amended.
One Stop Order Processing allows you to import and process orders for Ebay, Amazon, SellerDeck, Shopify, Magento, osCommerce, BigCommerce, RomanCart, eBid, XCart, Oxatis, Groupon, Wowcher, Paypal, Cdiscount. ekmpowershop, Etsy, Flubit, OpenCart, PinnacleCart, PrestaShop, WooCommerce, Weebly, ChannelAdvisor, ASOS Marketplace, OnBuy, Mighty Deals , Mail Order and Telephone Sales
Mole End Group of Companies |
|||||
| Products, plugins and utilities for SellerDeck | All your orders, from all your systems, all together in one simple-to-use application | Integrated label invoice paper and free software packages and templates. Print your invoice and labels at the same time | Print Amazon Despatch Notes with a peel out label with the customer's details on directly from Amazon | Print Ebay Invoices with a peel out label with the customer's details on directly from Ebay | |