One Stop Order Processing

One Stop Order Processing |
|
Orders are imported into One Stop Order Processing using the exported orders
file from the relevant internet site (e.g. ebay.co.uk).
To import orders select the Import Orders menu option (under File->Import
and Export) or click on the Import Orders button (![]() )
)
See Order Import Information on how to
retrieve the orders from the websites.
You are shown the various import types. If you select the relevant type and
either click on Edit or double click on the line you are shown the Order
Import Information options. This allows you to enter the name of the file
containing the order information. You can also tick the Prompt for filename
on each import option on the options page for each order type (except SellerDeck).
Each import type shows you the last time and date when orders were imported
and the number of orders. You can also give each import type a name.
When you click on the Add button you can choose the order type to create a profile for:

You can then adjust any specific details for the profile.
You can amend any of the existing order types, remove them or add or your own. This can be useful if you want to have different settings for the same sales channel. For example, you can have 3 Ebay import types, one for each of your ebay shops. It is useful to create different One Stop formats. These can be setup to import from custom sales channels or update orders (for tracking details).
An
Additional Import Options dialog is displayed after selecting the type of orders to import.
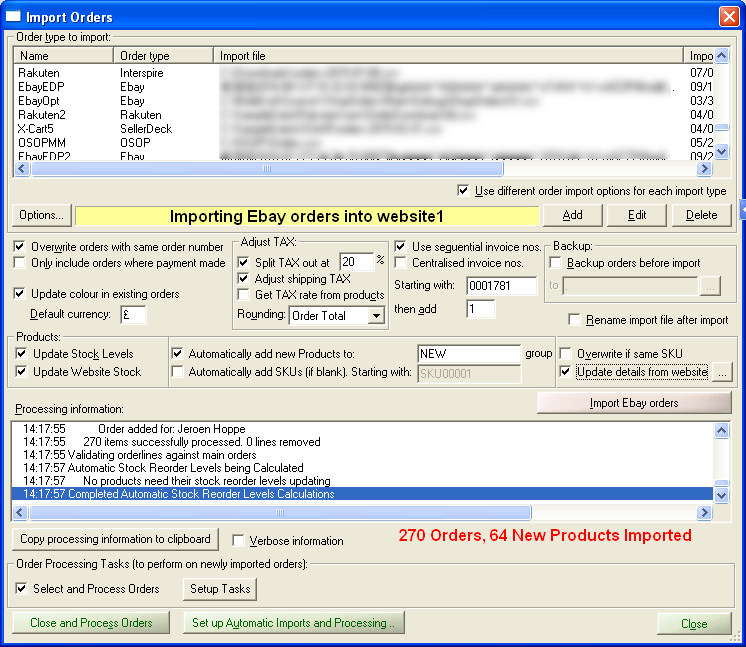
Import options
Overwrite orders with same order number
If you want to overwrite any changes that you have made in One Order Processing
(for example, the order details have been updated in Ebay) you should tick this
option. If you want to do most of the order processing in One Stop Order Processing
and want to import a single orders file that could contain previous orders (or
example, if you always create an Amazon orders report to include the last 30
days orders) you should untick the option.
If you use the are importing One Stop orders there is an additional Update
information in existing orders option. If you tick this option you can import
information into existing orders. This can be useful for adding order tracking
or other information from external systems. This feature can be used with all
orders type, not just OSOP orders (This feature can used for importing tracking
details for Amazon orders). See the Advanced Import section
for more details.
If you are using the the order colour on orders and want to keep the colour of orders when re-importing and overwriting order details untick the Update colour in existing orders option. This option is only shown if you have Overwrite orders with same order number ticked.
Backup existing orders before importing to
You can take a backup of the current orders file before any new orders are imported.
This can be used as a backup to restore the orders to a previous day's state.
The backed up orders filename is given the name
Backup{sitename}{Date and time}.zip. Where {sitename}
is the name of the current site being imported into and {Date
and time} is the current date and time.
Rename import file after importing
You should use this option for the following reasons:
1 If you want to keep a backup of all the files that you use to import orders from.
2 You always import your orders from the same filename and you want to make sure that this file will always be for the latest downloaded orders.
This is because some internet browsers will create a new file if that file already exists. If this option is ticked the file will not exist after the orders have been imported.
If this option is ticked and orders are successfully imported the filename given is renamed to the filename followed by the Year, Month, Day, Hours, Minutes and Seconds. For example, C:\Downloads\SaleHistory.csv is renamed to C:\Downloads\SaleHistory20150307140610.csv. This means the SalesHistory.csv file was imported from at 14:06 (and 10 seconds) on 7th March 2015.
Only include orders where payments have been received
With some websites (for example, Magento) orders can be included where they
are cancelled or haven't been paid for. You should tick this box if you only
to handle orders that have been paid for. However, you can use the filtering
options to only show (and process) paid orders.
Adjust orders to split TAX out
Using the default information provided by websites you can't normally issue
a TAX receipt. You can list orders on some websites (e.g. Ebay) that can (for
some orders) split the TAX out for you. Some other sites (e.g. X-Cart) don't
provide this facility. If you tick this option any orders that don't already
have their TAX taken out of the retail price have the TAX split out from the
order. This means that you can send out TAX invoices. You can also choose to not split the TAX for shipping (if required).
If you are using Ebay or Amazon Seller Central you can also split the VAT/TAX out based upon the product’s VA/TAXT rate. If this option is ticked, the product with the same SKU is looked for in the Products and if found the VAT/TAX rate assigned to that product is used.This can be useful if you have some products with a VAT/TAX rate of 0.
NOTE: If you are importing Ebay orders, the VAT/TAX rate defined in the Ebay file will be used. If this isn't defined in the Ebay orders the default will be used. However, if you are using Get VAT/TAX rate from products, wthis will override this VAT/TAX rate if it is defined for a product within the order.
The VAT/TAX rate used on an order is found in the following way.
1 If the Get VAT/TAX rate from product is ticked this value is used. If the product is not defined or this option is not ticked number 2 is used (shown below).
2 If the order is an Ebay order and a VAT/TAX rate has been defined this is used. If not defined the default value entered into the import box is used (in the Split VAT/TAX out at field)
If the location is not applicable for VAT/TAX any VAT/TAX found is not used and VAT/TAX is not split out.
Rounding
When TAX is calculated there maybe very small rounding errors. To keep the order's totals in balance a small amount may need to be added to one component of the order. You can choose to add this to the Order total (the items ordered) or the Tax (VAT/TAX). By default, the additional amounts are added to the Order total. You can change this to adjust the TAX amount owed if required.
Default currency
If the currency can not be determined from the orders imported or you are
creating manual orders this is the currency used.
Use sequential invoice numbers
This can be used to have a consistent invoicing system across all of your selling
areas. This includes manually entered orders. This may also be a requirement
of the invoicing system required by your company's accounting. You can set the
starting invoice number and format. Each time an order is added the number is
increased by a fixed value. The default value is 1.
NOTE: If you tick the Centralised invoice nos. all the users connected to the same site (e.g. website1) will use the same invoice numbering scheme. They will also share the same numbering scheme for newly created products.
Products
Update Stock Levels
If you have imported your products into One Stop Order Processing and have turned
on Stock Control this will update the stock level when importing the relevant
order.
Update Website Stock (This feature is available in Premium and Enterprise versions of One Stop Order Processing)
After any orders have been downloaded that reduce the stock of any products, those product stock levels are updated on any websites linked to by that product.
NOTE: When a product is automatically created it will have a link to the website that the product was sold on. The stock will not be updated on that website unless Use Stock control is enabled on that product.
Automatically add new Products to:
If you decide to automatically add products you can assign them all to a group.
This can be used to filter or categorise your products.
Overwrite if same SKU
Tick this option if you want to overwrite the product details each time an order is imported, if it already exists. This is useful feature if the product details that you want imported change in the source site. For example, if you update the cost price in SellerDeck and want to keep the One Stop Order Processing version up to date with this product tick this option.
Note: If you use this option any changes made to the product in One Stop Order Processing will be lost (including stock levels).
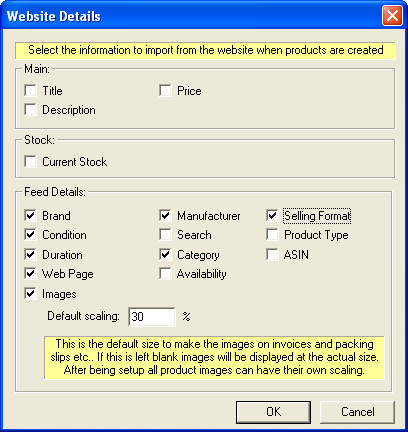
Update details from website (This feature is available in Premium and Enterprise versions of One Stop Order Processing)
If you are importing orders directly from a website (e.g. Ebay or Amazon) you can tick this option to bring in
all the product details for any products in orders. For example, if you want to display images on packing slips, if you tick this option it will update the product details with the images used (as well as other details, described below):
If you click on the ![]() button you can select which product information to import, shown below:
button you can select which product information to import, shown below:
Automatically add SKUs (if blank). Starting with:
If the products that you are importing does not have a SKU (e.g. Ebay orders)
you can assign a code to it. When the same product is downloaded later it will
be assigned the same SKU.
When importing products you can overwrite information. This can be very useful if the product definitions change (or are maintained in an external system).
NOTE: If you are using SellerDeck (version 9 onwards) the product Cost price is imported when a product is automatically created.
Other information
The names shown for the import types can be changed. For example, if you OSOP orders to be shown as MyOrders. To do this you will need to amend the file IL_Types.ini with a text editor. In this file under each type (e.g. Type1) is a field called Import. The text after the = can be changed. NOTE: If you use this option previous orders of this type will NOT be changed to the new text.
When you import the order information you can show additional information (tick
the Verbose information option) and copy any information to the clipboard
by clicking on the Copy processing information to clipboard.
Order Processing Tasks (to perform on newly imported orders)
After you have imported orders you can perform various tasks on the orders.
You need to tick Select and Process Orders then Click on the Close and Process Orders.
To setup the tasks to run click on the Setup Tasks button.
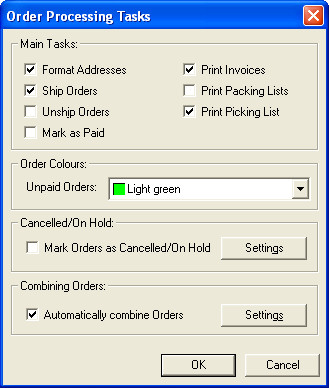
This will perform the tasks, if ticked, shown below.
Main Tasks
Format Addresses
Ship Orders
Unship Orders
Mark as Paid
Print Picking List
Print Packing List
Print Invoices
Order Colours
Set colour of unpaid orders
This sets the colour of ordes if they are unpaid. By default, this is set to Ignore. If you need to amend or add a new colour if you click on the ![]() button next to the Highlight Colour filter on the main screen.
button next to the Highlight Colour filter on the main screen.
Cancelled/On Hold
Mark orders as cancelled/on hold (This feature is available in Premium and Enterprise versions of One Stop Order Processing)
If you want to cancel orders before they have been imported (e.g. a customer has ordered from Amazon and then cancelled) you can add the order number to a file. When orders are imported any order numbers shown in the file are marked as canceled (or on hold) and are not included in the other order processing tasks. If you need to mark orders already imported as Cancelled or On Hold select the Edit->Batch Cancel/On Holder Orders menu option. To setup the options click on the ![]() button on the right of the checkbox. The following options are shown:
button on the right of the checkbox. The following options are shown:
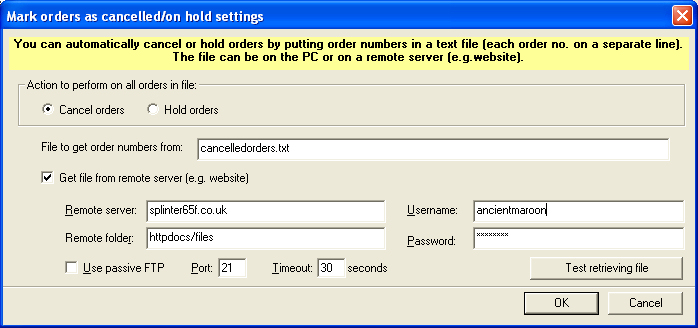
You can select either Cancel orders or Hold orders.
All orders in the file will be marked as cancelled or on hold
File to get order numbers from:
The file should be a text file with order numbers on separate lines for example.
186252
204-0898560-1443842
HX81JE10075421
The order numbers can be from any selling platform (in the example, the order numbers are from Ebay, Amazon and SellerDeck). If the order number is not found in the orders it is ignored.
Get file from remote server (e.g. website)
The file that contains the order numbers can be on a PC or remote server. If it is on the remote server you should just enter the filename in the File to get order numbers from box.
Remote server
The remote server where the file is stored. This can be an IP address (e.g. 203.82.42.89) or website name (e.g. splinter65r.co.uk)
Remote folder
The folder where the file is stored. This is the view of the file from FTP, which is normally diferent from the webserver. For example, httpdocs/files.
Username
The username for the FTP account that will access the file.
Password
The password for the FTP account. This is encrypted when stored and will never be shown.
Use passive FTP Port
The port that the FTP server is expecting to be connected to. This is normally set to 21, but can be changed if required.
Timeout
The tiime to wait before giving up trying to ge the file. This is needed incase the file can't be found or the web server.
Test Retrieving file
You should use this to test your settings when you have entered them to make sure the file can be found. Any errors will be shown on the screen.
Combining Orders (This feature is available in Premium and Enterprise versions of One Stop Order Processing)
You can automatically combine orders that are being sent to the same address. You can also choose to just change the colour of orders that One Stop Order Processing think should be combined. You can then manually combine these after you have checked them. To set the options up click on the Setup button
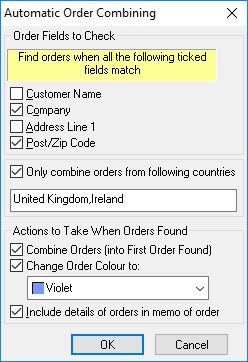
Order Fields to Check
These are the fields that should match if orders are to be combined. You must select at least one of the fields to compare. When the order details are compared all the ticked fields must match to be able to combine the orders.
You can additionally decide to only merge orders from defined countries. To do this tick the Only combine orders from following countries and enter the countries to combine orders from.
Actions to Take when Orders found
You can
decide to combine any matched orders, Change the colour of the combined order(s) and Include details of what orders have been combined (or could be combined) in the Notes fields of all the relevant orders.
NOTE: When you have clicked on the Close and Process Orders button all the imported orders will be selected. The orders shown will be in addition to the current filter. For example, if you are only showing orders from the last 7 days and you import orders from 30 days ago these orders from the last 30 days will also be selected and shown.This allows you to make sure that you always process all the orders imported. When you Refresh the orders (or use the F5 key) the order filter will be used again. In the example used, only the last 7 days orders will be shown once the Refresh has been used.
Automatically Import and Process Orders
If you are using a Professional or higher version of the software you can automatically import and process orders. This is explained in Automation for One Stop Order Processing
Advanced
Import
To import information into existing orders you only need to include the
Order ID and the required information (e.g. Delivery Instructions).
You can not include an order's item details (e.g. product codes), but you can
include all other order details (including Custom Entered values). An example
of a CSV is shown below. This can be edited in Microsoft Excel and exported
as a CSV file.
Order ID,Delivery Instructions,Custom:Entered val. 1
426-8234341-9441161,Leave with neighbour if out,JJ98324928
283-61188984-5408319,Leave with neighbour if out,TY342334
402-48239431-2828328,Leave with neighbour if out,KL123123
129-11112346-3745908,Leave with neighbour if out,DS823748
277-8758482-2751516,Leave with neighbour if out,RB819283
One Stop Order Processing allows you to import and process orders for Ebay, Amazon, SellerDeck, Shopify, Magento, osCommerce, BigCommerce, RomanCart, eBid, XCart, Oxatis, Groupon, Wowcher, Paypal, Cdiscount. ekmpowershop, Etsy, Flubit, OpenCart, PinnacleCart, PrestaShop, WooCommerce, Weebly, ChannelAdvisor, ASOS Marketplace, OnBuy, Mighty Deals , Mail Order and Telephone Sales
Mole End Group of Companies |
|||||
| Products, plugins and utilities for SellerDeck | All your orders, from all your systems, all together in one simple-to-use application | Integrated label invoice paper and free software packages and templates. Print your invoice and labels at the same time | Print Amazon Despatch Notes with a peel out label with the customer's details on directly from Amazon | Print Ebay Invoices with a peel out label with the customer's details on directly from Ebay | |